Wednesday, December 22, 2010

It's a Very Merry Christmas Risotto!


Christmas cards are just one of those things; either I get them out far too early, or, not at all. I only start feeling bad about not sending them out a week before Christmas, when my mailbox is stuffed full with beautiful greetings from my much loved family and friends. This year, my lovelies, there will not be a card from me in your mail box, so I sincerely hope this red and white risotto brings as much cheer or more. Try it - I know you'll love it! And please don't let the long name deter you from cooking risottos - they are much easier than you might imagine. (And who doesn't love a fancy shmancy dinner in about 30 minutes?)


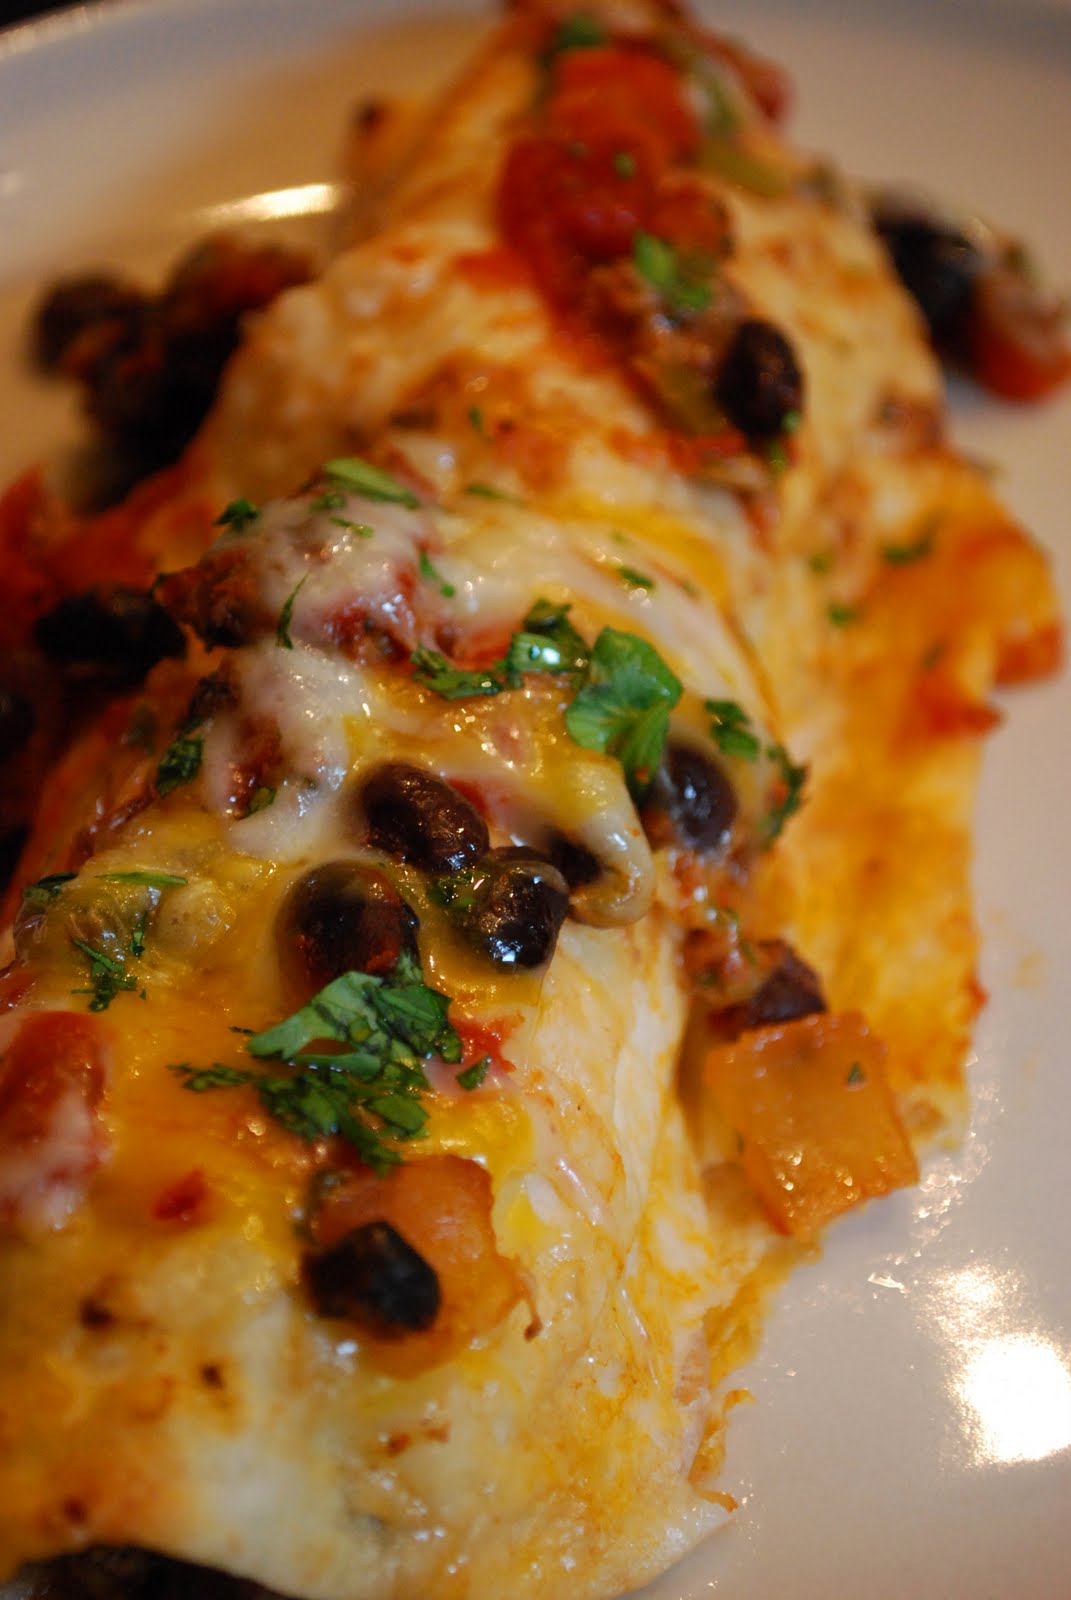
Creamy Asparagus and Sundried Tomato with Asiago Risotto,
topped with Shrimp and Scallop Scampi
Serves 4 - 6
3 + 2 tbsp tbsp unsalted butter
1 medium shallot, finely minced
1 lb Italian Arborio Rice
about 1.5 liters of good quality, low sodium chicken stock
about 1/3 cup freshly grated Asiago cheese
Kosher salt and freshly ground black pepper
a bundle of thin green asparagus, stalky ends removed and chopped into fine discs, leaving tops intact
10 sundried tomatoes in oil, drained, patted dry and diced
For the shrimp:
3 tbsp unsalted butter
3 cloves garlic, finely minced
Kosher salt and freshly ground black pepper
about 1/2 lb each raw, peeled, deveined shrimp and scallops
juice or half a lemon
Since risottos require constant, gentle stirring, make sure all ingredients are measured out, chopped, ready to go before beginning to cook. Get the chicken stock to a good simmer on a separate burner, leave it on low temperature until it's been used up in the rice.
Now, begin with a large saute pan or stock pot. Melt 3 tbsps butter on medium - low heat, then add the minced shallots and allow to cook until softened. Do not brown.
Add all the rice, stir and cook until the butter has absorbed into the rice.
Using a ladle, scoop one ladleful of the hot broth into your rice, stirring constantly until it's about 95% absorbed, then add your next ladle.
Repeat until the rice is cooked al dente if you like, or creamier if that's more to your taste, adding the chopped asparagus to the hot broth pot about half way through to gently cook it (the risotto should take about 25 minutes from start to finish, so toss the asparagus into the broth at about 15 minutes into cooking). Keep the heat for the rice on low-medium, so the broth doesn't absorb too quickly, other wise you'll end up with a gluey, yet still yummy, mess.
Side note: you may not use all the broth, at about 20 minutes into cooking, start tasting the rice to check for doneness. Check every couple minutes after that.
When the rice is done to your liking, remove it from the heat, and add in the chopped sundried tomatoes, 2 tbsp butter and shredded asiago.
For the Shrimp Scampi:
Rinse and pat the seafood nice and dry. Sprinkle generously with salt and pepper.
Meanwhile, take out a second saute pan, heat 3 tbsp of butter on med - high, then add the garlic, saute for about 30 seconds. Quickly add your shrimp and/or scallops, cook just until the color changes to pink (please don't over cook!). Add the fresh lemon juice, and you are done.
To plate the risotto, spoon rice into a deep plate, drizzle with a little olive oil, and top with shrimp and scallops. Have additional asiago available at the table for the cheese lovers in your family.
Wine suggestion: Jackson Triggs Riesling


Saturday, November 27, 2010

Caramels for all!


I won't lie to you - these little guys are time consuming, somewhat finicky, and will make a huge mess of your kitchen.

But aren't they fun?


As many of us have, I've been a part of many, many bake sales. They are, after all, great fundraisers and, I think, every one's a winner - baker and buyer. I have, however, grown tired of baking the same old thing, over and over, so I thought I'd change things up this year. I love it don't you? (But I my feet are exhausted, having added a good 10 dozen other - same old, same old - cookies to my bake sale contribution anyhow.)


I think these Caramels would make pretty fun favours for dinner parties or birthday gatherings, too.
Start by unwrapping store bought caramels, and poking them with a flat tooth pick each. Next, grab a few small bowls for sprinkles, coconut, toffee bits, or even crushed pistachios. Now you are ready to melt dark and white chocolate over a double boiler, being careful not to end up with any water drops or steam in the chocolate. I use bulk melting chocolate, it's cheap but doesn't taste cheap. Carefully twirl one caramel at a time in the chocolate, then dip into sprinkles, and onto a parchment paper lined cookie tray they go. Continue until all caramels look stunning, allow to dry for about an hour, then, using a spoon, hit it with some contrasting chocolate for fun detail.
Easy as 1 - 2 - 3. But give yourself at least 2 hours. Especially if you insist on pretty wrapping them with ribbons, like I did.

Saturday, November 20, 2010

Deliciousness and a little game of "Where's Waldo"

My Thursday turned out to be a fun day. Even with my strong disappointment in the Canadian public, and for the first time perhaps ever, possibly also a little embarrassment, too. Then again, maybe that's meant for a certain someone named Jamie Oliver, too. I've seen enough of him on my Telly to know he's a pretty chilled out guy, but Thursday, well...

Sadly, I did walk away from spending two hours in the same room as Mr. Oliver wondering. I'm not sure what I was wondering, but I am pretty sure the evening could have been much better. Should I point fingers at an audience that asked insanely stupid questions, like - "How do you do your hair, Jamie?" Or at a host that seemingly had not much more planned for the evening than to answer question after question from an audience more interested in his looks than his cooks. (I really should stop rhyming!)

Okay, okay... so it was really super cool to see him live... stupidity and all, Thursday will still be a day I'll always remember. And most importantly Jamie did kick me into cooking mode again, with a perfectly cooked steak which even I could smell and drool over far, far away from the stage, spanked with rosemary (yes, that would be spanked - ask me later) and tossed in fresh herbs and the ever important olive oil.

No later than Friday did I crack open a nice bottle of red, and before you could sing the Mary Poppins theme song, I had a gorgeous stew simmering away. So Jamie, you still rock. Everyone has off days, I suppose you can, too.

I am sure you've guessed it by now, there is no photo in my possession of Jamie and me, just a few fuzzy 'pics', this one being the best. (Isn't that sad?)


Red Wine Beef Stew with Potatoes & Rosemary
Adapted from Dave Lieberman

Serves 6


2 pounds beef chuck, 1-inch cubes
3 tbsp butter
4 carrots, peeled, halved lengthwise and cut into 1-inch pieces
3 small onions, diced
2 tbsp all purpose flour
2 cups white mushrooms
900 ml low sodium beef broth
2 cups red wine
1 cup canned crushed tomatoes
1 6-inch sprig of fresh rosemary
2 medium russet potatoes, peeled, 1-inch chunks
2 handfuls green and/or yellow beans, ends trimmed
2 tbsp fresh chopped parsley


Season the beef lightly with kosher salt and fresh ground pepper. Heat 2 tbsp of butter in a large, heavy pot over high heat. As soon as the butter starts to brown, add half the beef. Brown beef on all sides then remove from pot to a bowl. Add 1 tbsp of butter and brown remaining beef. Remove from pot also.

Toss carrots and onions into the pot, adjust the heat to medium. Cook until the onions start to turn translucent, about 5 minutes. Stir in the flour and stir until it has been worked into the veggies and you can't see it anymore.

Now add the beef broth, red wine, crushed tomatoes and toss in whole mushrooms and sprig of rosemary. Stir the beef back into the pot and bring to a boil.

Turn down the heat to a gentle simmer. Partially cover the pot and simmer for 50 minutes. Stir occasionally.

After 50 minutes, add the potatoes and simmer another 45 minutes, stirring once in a while.

Lastly, add the beans and allow them to heat through.

Serve with fresh parsley.

Tuesday, November 16, 2010

Mood Swing


I'm so very much in the mood lately.

Oh, don't even go there... THAT's not what I'm talking about.

No, every year the Christmas Season seemingly brings out a pregnancy like nesting in me. It's unstoppable. I don't hire designers, or shop at expensive stores. I diy. Do you?

This year things heated up in the bedroom first. NO, don't go THERE again!

After 10 years of hoping to buy that super awesome, solid wood bed I've had my eyes on, I finally gave in and went to IKEA. Why do I even hesitate. They should call the place MONEA. $15 for a wood closet door, a few flush mount brackets and a coordinating white bed skirt later, my husband and I could finally enjoy a proper looking bed. (I know you're smirking.)


Phase #2:
I thought it might be nice for the grown-ups to open stockings this Christmas, too.
So I started with a simple free online pattern, made it my own and went to town on a useless, over sized, heavy white quilt. I made five stockings, since my doggy has stolen a piece of my heart, and I'm pretty sure I'm not getting it back.


Next: Diy doesn't get much simpler than this, and yet I adore the results. Flip a poster in your largest frame so the back of the poster is now in the front. Separately print each desired letter on your home printer, and with as little glue as possible, center and evenly glue them on. Put the frame back together and think, "I could've spent $20 on that, but I didn't. Nice."
Decorating ideas stolen from friends I think pays them homage. Right? Well, I am guilty many times over (although this NOEL is all mine) and at Christmas, these cranberries in water with floating candles is my favourite bounty. It's also very budget friendly, coming in under $5. Changing the water once a week allows these babies to float and shine for many weeks. So start decorating early, November 1st sounds just about right to me.
I've also painted an old black and silver mirror white (white paint is the diy'ers best friend, FYI), and am currently working on transforming old beige curtains into a fun, yet sophisticated Advent Calendar. I am so over bad chocolate first thing in the morning.


And so we come to food. I've not challenged myself as of late. I do need to get back at it. But I do love some good staples, and I'll never tire of this Spicy Roast Chicken, out-of-this-world tender and succulent. A proper homemade gravy is irreplaceable, too. From scratch olive oil, s & p fries are delish along side tender baby greens with my Citrus Honey Vinaigrette. I could eat this every day. (All recipes on this blog.)


Tuesday, November 2, 2010

Fancy frugality


I am learning some new things these days. After 8 years far from the world of pay cheques and scheduled hours, and instead being my very own boss (ha ha, you know as well as me the kids have taken over!) I have returned and am discovering juggling schedules and priorities once again. Nope, I haven't made bread on a regular basis. Yup, there's packaged pizza in my freezer. And yes, I only work part time. Still, things have shifted, but, I am feeling refreshed and renewed with a new sense of purpose and/or responsibility.

Some things have not changed, however - some things never will. For one, budgeting food expenses. I'm convinced even the super wealthy have some sort of a food budget! And, I still very much enjoy taking budget meals and presenting them fanciful, even with time constraints and slow cookers doing part of my work. The kids are catching on to this idea, too, and are much more interested in dinner lately. "Make sure my potatoes are square, too, Mom!"

Is it as exciting to you as it is to me when "clean out the fridge and use up all the left over bits and pieces" dinners turn out super yummy? Certainly a slow cooker hides many flaws, and with a little plating ingenuity, meals from them can look more than one coloured slop. (Please do take a moment to feel inspired, to put away frustrations, and to get excited about your budget foods!)

So what's in this? And what do I call it? How about Upside Down Shepherd's Pie. If you ask my opinion, this version is much more pleasing to the eye than vice versa.

Towards the end of my grocery week, my choices become slim, and since I do not waste, I use up. I had -

1 onion
2 celery sticks
4 carrots
3 green onions
5 slices Prosciutto
1/2 cup tomato paste
1 cup red wine

To this I added some fresh things -

1 1/2 pounds lean ground beef
2 tbsp Worcestershire sauce
2 tbsp Dijon mustard
fresh ground pepper
kosher salt

I first browned the beef with the vegetables, as sauteing adds incredible flavour a slow cooker alone can not achieve. I then added the remaining bits and pieces, threw it all in the cooker, set it on low and walked away. What I do love about cooking this way, is how the aromas start filling the house a few hours in to it. Unfortunately, this also leaves me hungry hours before the dinner table is set.

I love fluffy mashed potatoes, and so, rather than adding them raw into the crock with everything else, I find it very well worth my time to cook these stove top. This extra step also ensures a beautiful jus-like gravy, as the potatoes did not get the chance to soak up those scrumptious liquids. I search my kitchen for an ingenious way to plate the mash, and discover part of my Spaetzle maker works amazingly well. A little fresh parsley, which is still growing like mad in my garden even though it's rather frosty in beautiful Canada these days, chopped and sprinkled adds a little texture and a whole lot of fresh. Seconds, anyone?


Tuesday, October 26, 2010

Citrus Honey Vinaigrette


We've all done it...

Called recipes our own, when in reality, they've probably either been passed down to us by a loving grandmother, or a google search proved successful, perhaps a favourite TV chef taught us something or other new.

So where do we draw the line in the sand, I mean in our own recipe collection, which will hopefully one day, be passed down to the next generation, only for them to claim it as their very own. I say, change a recipe enough, even if it's still similar to the first, you can call it your own. The fine print is up to you.

And yet, I still want to give credit for my absolute favourite vinaigrette to the very inspiring Martha Stewart, who, in the TV world anyway, is what we as domestic goddesses strive to be - perfection in the kitchen and garden, while gift giving, decorating and knitting. (If only we all had a crew of professionals having our backs to make us so very perfect. Except for the jail thing, of coarse.)

Moni's Citrus Honey Vinaigrette
Serves 6 - 8
Inspired by Martha, changed significantly to call it my own

Juice of one large lemon
2 tbsp creamed honey
4 tsp apple cider vinegar
2 tbsp finely minced shallot
1/2 tsp coarse salt
1/4 tsp black pepper
1/4 cup extra virgin olive oil

Vigorously whisk together everything but the olive oil. Once the honey has dissolved, slowly whisk in the olive oil.

Store left overs in the fridge. Olive oil will harden when cooled, simply bring back to room temperature and whisk again.


Monday, October 11, 2010

Perfect Fall Bread


This month Canadian TV celebrates 10 years of Food TV. I think that's quite spectacular, considering less and less people are spending time in their kitchens these days. A short news article had a great explanation for this oddity, stating: ingrained in human nature is a need or instinct to gather around food and be with our circle of friends and, of course, family. Since this is happening less and less, we watch more and more Food TV, which tricks the psyche into having such a need fulfilled. Make sense? I think so. Huh.

My husband won't agree with me, but I don't consider myself to be a great cook. I just love to do it, and so I keep on trying. What makes me smile the most though, even more so than cooking a meal for others, is inspiring people to get their own aprons on and kitchens dirty. And to me there is nothing more down to earth than baking amazing bread, filling the house with that unmistakable aroma, and enjoying simplicity at it's finest.

Now don't get me wrong, I watch a ton of Food TV. Learning while watching TV seems more justifiable, right? Anyway, I've been super inspired to take common foods and adding my own twist. So here's a bread I came up with - I think it's perfect for Thanksgiving. The rustic texture plays well with tart Cranberries. And I adore the leaf design, too.


Rustic Rye, Caraway and Cranberry Bread
Makes 2 loaves
2 1/2 cups white bread flour
1 1/2 cups dark rye flour
2 tsp fine grain salt
1 1/2 tsp active dry yeast
12 fluid ounces warm water
1 cup dried cranberries
1 tsp caraway seeds
Dissolve yeast in the warm water, this takes about 10 minutes.
In a large bowl, combine flours with salt. Once the yeast is ready, add the water mixture to the bowl.
Using your hands, combine until it comes together in a ball, then turn out onto counter top and knead for about 10 minutes.
Fold in the cranberries and caraway seeds.
Shape into a ball and place back in the bowl, cover with a lint free dish towel and set in a warm place (24 C) for one hour.
After the first rise, divide the dough into two, and shape each into a ball. Cover with the dishtowel, and rest for 10 minutes.
Now gently shape each into a 20cm (8 inch) log, dust with flour, place on a cookie sheet (with parchment paper) or baking stone, cover with the dishtowel and rise again, for one hour.
Preheat oven to 375 F (180 C).
To make the leaf design, use a sharp knife to gently cut one long slit down the center and about 5 on each side. Do this gently, without deflating the bread.
Bake in the preheat oven for about 35 minutes, or until it sounds hollow when knocking on the bottom of the bread.
If you want a crunchier crust, spray the inside of the oven 2 or 3 times with a water bottle just before placing the bread in it for baking.

Sunday, October 10, 2010

The new. The old. The pretty. Pretty creative!

I had this funny idea the other day which involved me dusting off my hand-me-down sowing machine, and giving it a well deserved second chance. It's been about 6 years since I've touched that thing, and sadly, there are more memories of frustration than fabulous. But some craft bug bit me and I gave in.


From experience I know now more than ever, that one's things certain - Where there is nothing ventured, nothing is gained. Perfection need not be attained, success may not come over night, but I suddenly feel more domesticated than I did two weeks ago and I want more of that! I do find myself rather surprised at being able to do more than I ever would allow myself if I still feared failure like I did once not so long ago. So get out there, do something... start with one step, then add the next... you just never know where it may lead.


With that I want to say, Happy Thanksgiving... or rather Happy giving thanks... Since it's not just about the turkey and an amazing nap which inevitably follows, but about truly taking time to appreciate, to stand in awe of life, to smile with gratitude just because you can.
Here are a few things I am thankful for this year:

Alone time. And writing. I love that I found writing.

Together time. I have an amazing family, and so many super duper friends.

Walks with my dog. If you've never tried it, you really should.

Clearance racks. Any store, any time. And ikea. Even though I wish I could get away from that place, it's easier to just go back.

My new job, which allows me to work while the girls are at school, and only then, with plenty of time left over for my real life: domestic bliss.

My camera. And photoshop. And a husband that can teach me how to use photoshop to rescue my picture taking abilities.

The unconditional love for and from my kids. As you may know, we all have bad days once in a while. Yet they still keep coming back for more lovin. I suppose that also goes for the love of my life, Paul!

Canada. What a beautiful home we have. And to think we celebrate Thanksgiving at the right time, shortly after harvest and while Fall colours are at their prime! (a-hem)

Road trips. Especially spontaneous ones.

Dinosaurs. Because they make my sweet Sydney so happy.

Music. Especially when Hannah sings to it. Wow, that takes me over the moon.

Hair straighteners. These make me happy.

My parents, who embark on a long cross continental trip to visit with us every year.

Toothpaste. I'll forever be thankful for toothpaste. If you ever feel like you have nothing to be thankful for, start there.

My security in God. There's just something very freeing about that.

Felt. For making me feel like I can sew. Even if my oh-so-hip Hannah Banana hands me Sewing for Dummies.


Saturday, October 2, 2010

Apples, apples everywhere!


I hardly ever cook breakfast. I don't really know why, but I just prefer to pour a bowl of cereal for my clan instead. The odd Saturday, however, when we sleep in a little, and awake during Brunch hour, I brew a nice pot of coffee and break out the pots and pans.


Apple Crisp Porridge
Serves 4

2 tbsp unsalted butter
3 large Royal Gala Apples, peeled, quartered, cored and sliced
1/4 dark brown sugar
1 tsp ground cinnamon

2 cups rolled oats
2 cups 2% milk
2 cups filtered water
1 tbsp dark brown sugar
good pinch of salt


Melt butter in a saucepan at medium heat. When frothy, add the apples, 1/4 cup brown sugar, and cinnamon. Cook, stirring often, uncovered, for about 15 - 20 minutes, or until apples are soft and sugar has become sticky.

Meanwhile, combine oats, milk, water, 1 tbsp brown sugar and salt in a separate saucepan. Cook over low - medium heat until oats are soft, about 5 - 10 minutes. Stir often to prevent burning.

To serve, spoon porridge into 4 bowls and scoop apples over. Garnish with cream, and a variety of nuts and seeds for crunch.


Friday, October 1, 2010

~ Making Pasta ~ with Nonna


There are a few things quite evident when cooking with a real Italian Nonna.

I am much taller than I remembered.

Kitchens don't need to be fancy to make the best of the best.

You pick up the Italian language on the fly. I may never call farina flour again, and possibly add an 'a' to the end of many English words. "Farina, it's'a' tha name of the game'a'!"

Oh, it's good to giggle like a school girl again. And french braid my hair!


After a quick coffee and a variety of homemade cookies, Nonna handed me a bandanna and an apron, which felt to me like the best "Welcome to my kitchen, let's cook!" I have ever experienced.

There is no recipe, four hands stepping in as our most valued tools. I feel at home, so very much at home! Out comes the farina, a dozen eggs, a little olive oil and a hand measured tablespoon of salt. Surprisingly, pasta dough needs a lot less attention than bread dough. And just a short while of kneading later, we are ready for the pasta machine. Here again, it's mostly a thing of touch and feel. Give me one of those new cell phones or a TV with far too many options, I am utterly lost. Farina.. it's catchy, isn't it?... I get it. We are friends. I love my hands more than ever, too, even if they aren't super girly and slender. These are working hands and I plan on putting them to good use.


We get a system going, Nonna and I. Before you know it two hours are up, and we've made gorgeous Fettuccine and a big batch of Spaghettini, too. Nonna tells me I am a fast learner. I tell myself she must be telling the truth, an Italian grandma would never tell a lie. I have visions of turning my kitchen into pasta heaven, I think primarily of Ravioli, filled with beautiful things like ricotta, squash and mushrooms. I dream of inviting friends over for a glass of wine and a rustic bowl of egg pasta, swirled with the most amazing cream sauce. Life is beautiful, my friends. A certain beauty no one needs to miss out on.


Of course there's no better way to finish up an Italian morning than with a slice of pizza for lunch, a glass of red wine with one gorgeous ice cube cooling it down to the perfect temperature (hey, when Nonna offers, I don't refuse - she was proud of the ice cube, and I was happy to try something new).

Thank you, Nonna. You've allowed one of my dreams to come true. I hope to cook for you one day and potentially impress you, too. I promise to pass this knowledge on to my girls, and they are going to promise me to pass it on to their kids, I'll make sure of it. You can't put a price tag on something like this!


Photo credits belong to my good friend, Erin, who is also Nonna's real grandchild and super talented, wouldn't you say?

Wednesday, September 29, 2010

Bitter Sweet


I dis-like goodbyes. I tend to cry like a baby, my eyes turn red for an hour, and I feel a little empty inside. One of my kids inherited this unavoidable tendency to cry, while my husband and youngest manage to stay composed, since they seem to know that goodbyes are not forever, they are simply see-you-laters. Oh how I've tried to keep my cheeks dry, my eyes white, my dignity in tact. I think cold, heartless thoughts. I pretend we are driving to the zoo, not the airport. I plan for the future, when we'll reunite.

Nothing. Nope, nothing seems to help. On the contrary, holding those crocodiles in just makes them burst like Niagara Falls. So today, when I drop my parents off to catch their plane back to my childhood home, far far away, I am not holding back. I am going to let myself feel what needs to be felt, I am sure it's better that way, anyway.

Saying goodbye to Summer can be bitter sweet, too. At least one thing's guaranteed, it'll be back in about eight or nine months. For kitchen people like me, there is something super special and unique about transitioning from hot days to cool ones, as we continue to enjoy the fruits of Summer's bounty, but crave the comfort of warmed bellies.

So here's a little twist on Zucchini Bread. When I take that first bite, I am reminded of the sweetness of Summer yet enjoy the comfort of Fall, and my tears are no where to be seen.

Spiced Zucchini with Apricot Bread

1/2 cup softened butter
1 cup white sugar
2 large eggs
1 1/2 tsp real vanilla extract
1 cup shredded zucchini
3/4 cup diced, dried apricots
1/4 tsp salt
1/2 tsp baking soda
1/4 tsp baking powder
1 tsp cinnamon
1/4 tsp nutmeg
1/4 ground cloves
1 cup all purpose flour
1/2 cup whole wheat flour

Preheat oven to 350 F.
Combine butter and sugar in a large bowl. Whisk for a minute or two, then add the vanilla and eggs. Stir in zucchini and apricots.
In a separate bowl, sift together salt, baking soda, baking powder, spices and flour.
Using a small spatula, pour the dry ingredients into the large bowl, then gently stir only just until combined. The more you stir, the denser the bread becomes.
Grease a loaf pan, fill with batter.
Bake in the 350 F oven for one hour.

Friday, September 17, 2010

Standing ovation


Hello. It's been a while. It's been busy. I suppose that's life!


We've officially said good-bye to Summer, and I am OK with that, as you know, I celebrate these kind of things. I feel a bit like an empty Nester, as both kids are off to full day school. Yet still, days are full of to-do lists... The next time you, the homemaker, are drilled with what it is you fill your day with, just give your opponent a disapproving look. These people have no clue. Which makes me think, we have holidays for just about everything, and yes, that includes Mothers Day, but I personally believe there should be a day that celebrates the HOMEMAKER. Western society has lost appreciation for it. Working mothers get their applause for doing it all... I think us homemakers should get a standing ovation, for doing it all on a teeny tiny budget, for tidy homes, beautiful dinners, happy kids, I mean everything. Who's with me here?

Of course the perfect homemaker is also the perfect host. Ever ready to welcome, feed and send guests off with plenty to talk about. And since you are perfect, you always have a lush supply of crunchy vegetables in your kitchen. (Right?!) So keep a few more things kicking around, and you'll have yourself the perfect hummus to match.


Smokey Hummus
Makes 1 1/2 cups

1 - 2 garlic cloves
1/4 tsp kosher salt
one 15 ounce can chickpeas, drained
1 1/2 tbsp sesame tahini
1 lemon, for juicing
3 - 4 tbsp olive oil
1 tsp ground cumin
1/4 tsp Spanish paprika
several dashes of hot sauce - you decide how much

Place the garlic and salt in a food processor or blender. Process until coarsely chopped.
Add everything else, and process until smooth.
Check seasoning, adding more salt, lemon juice or hot sauce as desired.
Process until very smooth.

Sprinkle with a little paprika and a dash of olive oil, serve at room temperature.
Can be stored in the fridge for up to 5 days.

Tuesday, August 31, 2010

Picky eater

When you've had a crazy day, when you've been to ten stores and still can't find sneakers for your kids' first day back to school, and when these same kids somehow - really, it's beyond me - picked a rather large tear into a second leather dining chair, and the doors you've painted twice need an unfortunate third coat, I'd say it's a good time to recharge with a plate of homemade food.

Funny thing, the other day I made meatballs and decided to use up a gravy powder mix uselessly sitting around my spice rack, to accompany these little organic meaty morsels. One by one we took our first bites. We went back for a second. We couldn't place it right away... it just tasted so, fake. Needless to say, I threw out the rest of that powdery yuck, and will stick to homemade. Always. Period.

Who needs packaged food when basic steak, grilled chicken, or even sausage can be enjoyed with super fast, amazingly scrumptious mushrooms. Don't even try to make these low fat, diet, or whatever makes you feel good about eating. Packaged food is far worse nutrition than a little bacon fat.


Bacon Mushroom Saute

1 lb Cremini Mushrooms, sliced
8 slices Bacon, roughly chopped
1 medium Onion, finely chopped
2 tbsp Olive Oil
1/4 cup finely chopped fresh Chives

Heat the olive oil in a skillet on medium - high heat. Add the chopped bacon, saute until about half cooked.
Add the finely chopped onions, continue to cook on medium - high heat, stirring, until bacon is crisp and onions soft.
Toss in the sliced mushrooms. Give it a good stir, cook until the mushrooms are nicely browned. Remove from heat.
Stir in the chopped chives. Season with kosher salt and freshly ground pepper, to taste.

Now, enjoy!

Monday, August 23, 2010

Sometimes I crack myself up. But only sometimes.


My kitchen's a mess from cooking all day. I'm wearing my favourite blue jeans. The Summer air is crisp, and I've baked bread today. This home cook is as happy as can be! Certainly it's not just me who gets excited about these things?

When asked which season I enjoy the most, I never quite get my answer right. Is it Summer? I suppose it was, as a child, since school was out and we lived in our bathing suits. Or is it Spring? Where everything dead comes alive, and those first Spring flowers bloom in full color. Or perhaps Fall...

Today I will answer, because today I can!
My most favourite Season is no season at all...
I'm lucky as can be, it comes four times a year.
It's the change of Season I love.
Especially when celebrated with a beer.


All right, so I am not much of a poet! But who says I can't try?


Pimped up Garlic Bread
Serves 6

1 large loaf Italian style bread (or homemade french bread, shaped as a letter, like mine today - these things happen when one loves to cook), halved lengthwise
8 - 10 garlic cloves, uniform size, skins left on
6 tbsp unsalted Butter, softened
2 tbsp finely grated fresh Parmesan
1/2 tsp salt
ground black pepper
1 tbsp each fresh basil and chives, finely chopped
1/2 tbsp each fresh thyme and oregano, freshly chopped


Preheat oven to 500 F.
Toast garlic cloves in a dry skillet, shaking pan occasionally, until fragrant and color of cloves deepens slightly, about 8 minutes. Remove from skillet. When cool enough to handle, peel and mince the garlic.
Using a dinner fork, mash garlic and remaining ingredients into butter until thoroughly combined.
Spread cut sides of loaf evenly with garlic butter, transfer to cookie sheet and bake on middle oven rack for 5 - 8 minutes, until golden brown and toasted. Cut each into 2 inch slices, serve immediately.


Friday, August 20, 2010

I like it.


You want to know something? I am not a big fan of cooked zucchini. Unless it's one of those huge homegrown zucchinis, marinated and tossed on the grill.


Nope, I like my zucchini in the raw. Simply cut into ribbons, and dressed with a light vinaigrette.

(These European style peelers easily replace the use of a mandolin, by the way. And for the $5 price tag, I think every kitchen should have one.)


Tuesday, August 10, 2010

Life's next steps

All too often as I pull the covers over my head at night and tuck myself in rather tightly, my mind decides to wake up and wander to all sorts of new, clear thoughts. This must be one of those mommy symptoms, since during a busy mommy day our minds belong to a variety of other places. My husband and I connect at least once or twice during a typical weekday of work, cleaning, and kids. He will often ask me what the plan is for the day, and I find myself scrambling for an exciting, busy sounding answer, because my day, after all, is exciting and busy. There's never a dull moment, that's for sure! But still my answer is the same, day after day - There's cleaning to do, kids to nurture, guide, and feed, the dog needs my attention, the yard can use a weeding, and the days ahead are to be planned. And so, my answer is, "Well, the usual!" Whilst I sometimes question myself, am I doing all I can do? Here comes mommy symptom number, hhm, well, who knows... there's just too many - Doing ten things at once, which we could probably do with our eyes closed and more often than not, don't put enough value on each individual task. To bring things into perspective, I allow myself to imagine what life would look and be like if I stopped doing what I do for a few days. Can you imagine? It takes a village to replace a mother's work.

But let me take you back to that special moment of tranquility, a moment we can't quite comprehend as wonderful while we are, ourselves, children - bedtime. For some it may be the morning shower, or perhaps reading a newspaper on the, um, you know what. For me, this is place is my bed. I am sure my plain white bedsheets, pillow cases and shams came out of a need for peace and serenity after a busy day of primary colors, excitement and chores. So as I lay there last night, listening to the crickets enjoying our grass grown too long, I decided I would embark on a journey I have long dreamed about. I want to write a book. And while it's not common for me to share intimate desires as this, for me, a closet dreamer, I have come to realize that while sometimes critics can bring about a sense of vulnerability, others can bring support and added insight.

My first book thoughts came to me, at bedtime even then, child-less and a young 16, at night when all was quiet. My point of view has changed over the years, from writing a cookbook to inspire College students to eat more than Twinkies and Kraft Dinner, to wishing I was a gourmet chef and coming up with all sorts of new concoctions, all the way to realizing how much I love Reality Reading, much like Reality TV, but without the commercials and fake spins that sell shows to more viewers. The problem with Closet Dreamers is that we don't allow ourselves to value our dreams much, we don't share them because we fear they lack importance. But if there is one thing I have learned from surfacing my thoughts, ideas and flops on this simple blog, it's that everyone has something they can do, something they can share, someone they can reach. And usually it's the smallest things that make the biggest impact.

I'm not sure how much I want to share about the actual premise of the book, however one thing's for sure, it will be that of a life's journey, one of taking little steps and following through with plans. It will involve my many, little passions - food, fun, family, and the environment.

Until then, you'll find me right here, photographing and blogging, and hopefully not stepping on anybody's toes.

Monday, August 9, 2010

Sugar and Spice


There certainly is a limit to my homemaking aspirations, for example I would never bother with brewing my own beer or making Cheddar Cheese, but spice blends, although conveniently pre-jarred, are probably much better homeade, with a little added personal touch.

It's a rainy day today, a beautiful warm rain, plumping up dull brown grass and saving me a little herb garden watering time. And so, after many weeks of salads, barbecues and other low heat emitting food preparations, my girls asked for a big pot of Chili for our family dinner. I was happy to be able to oblige, as Chili is easily made with common pantry items. But this happened to turn into the perfect homemade spice blend opportunity, as no Chili Powder was to be found amongst my spice rack.

A little googling later, I discovered just how easy this task would be:
Using a coffee grinder, I zapped a few small red chili's into fine powder, then added equal amounts of dried oregano, cumin powder, coriander seeds and paprika. (About 1/8 cup each.) These are, I am sure, entry level Chili spice blend making skills... but my Chili is smelling pretty tasty as it simmers away in the kitchen.

I am left wondering if toasting the spices before cooking would bring out the flavour even more. Or what those secret ingredients are master barbecuers win competitions with. If you'd like to share your wisdom, I would love to hear from ya!


Flip and Tumble


For the past year or two, I have been using cloth shopping bags to transport my groceries from supermarket, farmer's market or fresh fruit stand, to home. The sheer amount of garbage that is not in our landfills, lakes and on city sidewalks is enormous. Too often we shy away from doing our small part since it's just too hard to see the overall picture. But cut out plastic bags and plastic water bottles, and it's not hard to miss how much we are doing. Imagine 50 years from now, the mountains of plastic that could either be in our landfills, or not. Reusable shopping bags make it easy on us to do our part. However, one thing that has bothered me, a veggie loving, fresh food preferring consumer, is the 10 clear produce bags that keep showing up in my shopping cart, week after week. Has this dilemma ever crossed your mind? Well, do I have a treat for you!

They are called Flip & Tumble Reusable Produce Bags. Each holds up to 8 pounds of produce and has a drawstring closure. The mesh bags allow for easy scanning at the store and washing at home, right in the bag! And at just $10.95 for 5 bags, it's affordable and I think, the next step in eco-friendly grocery shopping.

Interested? Order yours here: http://www.reuseit.com/

PS: It's a good idea to throw all fabric grocery bags in the wash from time to time. Juices from meats can leak and contaminate whatever goes into the bag next time you are out shopping.

Wednesday, August 4, 2010

Yes, Sir!


When Bobby Flay talks Burgers, we listen. We do as he says. And we throw out our idea of what a good homemade burger patty should be. What I am talking about is all that extra stuff we mix and over mix into our ground chuck to"hold everything together and build flavour". Things like eggs, breadcrumbs and onions. Forget them, leave them behind. It's about to get much simpler. And oh so much tastier.


Since burgers a la Bobby is a super fast operation, you'll want to heat the BBQ to high before getting to the meat so it's good and ready when you are.

If your ground beef is packaged like mine, it will look a little like a flat, rectangle brick. Using a knife, cut/divide this meat into four even portions, right there, in the package (after removing any wrapping, of course). Gently shape each portion into a 3/4 inch thick patty. Do not overwork the meat, don't squeeze it, don't compress more than you need to. Nobody likes a dry burger. Now make an impression in the middle of each patty. This prevents it from puffing up and looking more like a flying saucer than a burger.

The patties are just about done - a little seasoning of coarse kosher salt and freshly ground black pepper on all sides, plus a little swipe of grape seed oil over everything, and we are ready for the BBQ.

Gently place the patties onto the grill, cook for about 5 minutes on each side for well done. Flip once only half way through, and never ever press down on them. Nobody likes a dry burger. At roughly minute number 9, place cheese of your choice on the patties, and close the BBQ for just a quick minute to melt it. I like to toast the buns at the same time I am melting cheese. After about a minute, remove the buns, place your patties on the bun bottoms and slather with toppings. This is where you want to build flavour. Think outside the patty, not in.

For this Cheyenne Burger I used Old Cheddar, Barbecue sauce, French Fried Onions and fresh chopped Parsley.

Now that's what I call a good burger.

By the way, I've made a rather interesting discovery: Grass-fed organic ground beef hardly shrinks during the cooking process. Meaning you'll have more on your plate, and less in the barbecue drip pan. Besides, it's so much better for you, and the animal.


Saturday, July 31, 2010

What, it's dinner time again?!

Um, good-bye July? Seriously?

I won't say it, I promise...

...OK, so maybe I will. Time flies. There, I said it. It's annoying, I know, everyone says it, too much. But for some reason Summer seems to be winding down, and this brings with it the likeness of a close friends' good-bye. Sure, if we use our time wisely, and fill it with great things, however small they may be, I think we live as though on a surf board, gliding through life with it's ups and downs at a tremendous speed, never stopping to look back with regret. Summer always goes by too fast, which is why I might slap you if I ever catch you complaining about it being too hot. Since now you see it, then suddenly, you don't. Of course, it's rather comforting to know Fall is next in line, like a big warm chunky knit blanket wrapped around us, telling us, don't worry - Summer will be back in a few months.

We didn't have much planned this season, there's family in town, friends to catch up with and our kids needed to be given the time and motivation to finally master swimming and riding their bikes. Those were our goals for this year, may I say simple, yet I love the idea of slowing down and taking time for small details as though they were hugely important to the overall scheme of life. And I suppose they are.


And as time flies by, so does dinner time. Here's one of my favourites:

Beef Enchiladas

1 lb extra lean, grass-fed organic ground beef
1 cup chopped green peppers
1 cup chopped red peppers
1-2 jalapeno peppers, seeded if desired, chopped
1/2 - 1 tsp salt
2 cups tomato salsa
1 (19 fl oz/540 mL) can black beans, drained
1/2 cup old Cheddar
1/2 cup Mozzarella
2 tbsp olive oil
1 cup finely chopped fresh cilantro
8 - 10 flour tortillas, about 7 inches in diameter

Preheat oven to 400 F.
Heat a large skillet to medium, add beef, all peppers and salt to taste. Cook until meat has browned. Add 1 cup salsa and the drained beans; simmer 3 - 4 minutes. Remove from heat and stir in 1/4 cup cheddar, 1/4 cup mozzarella and all but 3 tablespoons of the chopped cilantro.
Spread 1/4 cup of salsa onto the bottom of a 9 x 13 glass baking dish.
Using a pastry brush, lightly coat each tortilla with olive oil, stack on a plate, then cover with a dish towel and microwave about 25 seconds, or until just warm.
Immediately spoon 1/2 cup meat and bean filling down the center of each tortilla, roll up tightly and place in the prepared baking dish, seam side down. Repeat to fill all tortillas, laying them single file. If you have extra filling, spoon this on top of the tortillas with the remaining 3/4 cup salsa.
Cover with aluminum foil.
Bake covered for 20 minutes.
Remove foil, sprinkle with remaining cheeses and bake additional 2 - 3 minutes.
Top with 2 -3 tbsp chopped cilantro and serve immediately.


Thursday, July 22, 2010

Itty bitty


We pack snacks and drinks. We make sure they are healthy, not messy and, hopefully, will keep bellies full for at least a little while. We are moms, and we panic when it comes to preparing snacks! (Or school lunches, for that matter.)


Here's an itty bitty look into what my kids get served on day trips: Cheese Quesadillas. Not only can I make a large amount of these in a very short time, they also travel well and are a completely balanced meal. Especially if you bring home made salsa. But that takes time, and since this is all about getting out the door quickly, I keep a bulk jug of good quality salsa in my fridge, most of the time.

To make:
Place a tortilla wrap in a dry saute pan, medium - low heat. Sprinkle desired amount of shredded cheese to cover, then place second tortilla wrap to cover. Heat for a couple of minutes, then flip to heat other side. Remove from pan and cool on a cookie rack. Repeat to make enough for all the kids, their friends, and possibly the parents too. Slice quesadillas in half, then into thirds. Divide into baggies when completely cooled. Portion salsa into small plastic containers, and you're off to the races.

OK, I know these wraps are super simple and most certainly not revolutionary, but it's these little things that make life just that itty bitty more enjoyable.

You're welcome.